
A beginner’s guide to white water SUP #2 – the moves!

By Del Read – https://delkayaks.co.uk
@del_likes_kayaking
Photos: Eve Thurgood, Tom Clare and Del Read
Having gotten into white water stand-up paddling boarding (SUP) last year, I decided to put together a series of white water SUP-focused articles. The articles are to help guide beginners in white water SUP, and each article has a different focus and a different guest writer. My first article introduced the series and focused on the different boards you find in SUP. This article will be about the basic moves on white water that you can do on a SUP and how to achieve them.
Big thank you to my lovely friend and coach Tom Bayliss for being a guest writer in this article.
Tom Bayliss
Tom Bayliss is another Nottingham local with a passion for white water SUP. He is currently training to be a paramedic at Hull University. In his holidays, Tom works at HPP, which gives him the perfect opportunity to get out on his SUP regularly as Tom is a huge white water SUP enthusiast and is always keen to support others to give the sport a go. Tom talks through some of the basic moves on white water and how you can achieve them on a SUP.

Del Reid and Tom Bayliss
1. How to paddle a SUP downstream on white water
Going downstream through moving water on a SUP is one of the first things you must tackle when beginning white water SUP. When you exclude actual features such as ‘holes and waves’ and focus on the simple sections of slower-moving water, this process is similar to flat water. There are, however, a few differences to consider that essentially aims to help you keep balanced whilst the moving water tries to send you flying off your board!
Del here! “A hole (also called stoppers or hydraulics) or a wave is a feature on white water caused by the gradient and uneven surface of the riverbed. A wave is generally easier to pass through compared to a hole. Holes have an area of turbulent water moving back upstream that can slow you down or even get you stuck. If you don’t have previous experience with whitewater, it’s always best to go with someone with experience as they can point out potential dangers, such as some holes, to you. And again, always wear a waist leash!” Back to Tom!
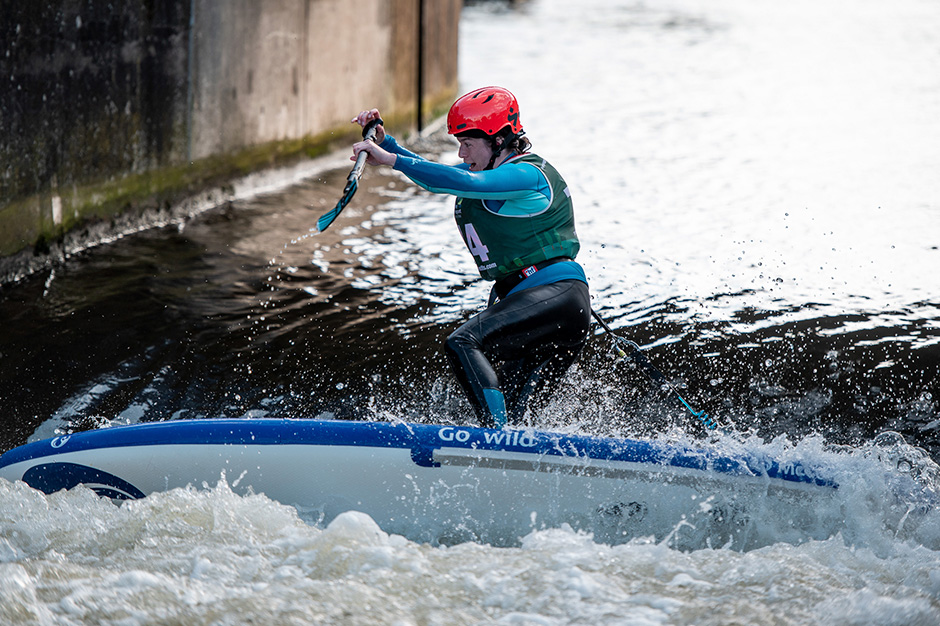
Me getting pulled back into a hole at HPP. I didn’t have enough speed and so ended up swimming! Photo: Tom Clare
Getting balanced on a SUP: The tripod stance
The first thing to consider is body positioning and what is commonly referred to as the tripod stance. This gives you a much more defined ‘three points of contact’ with the water, enabling better balance. To achieve this positioning on the board, one foot is placed in front of the other (much like a surfer’s stance) but still maintaining the forwards facing position. This enables one foot to keep front-to-back balance whilst the other can be used for side-to-side balance, depending on how pushes back on the board.

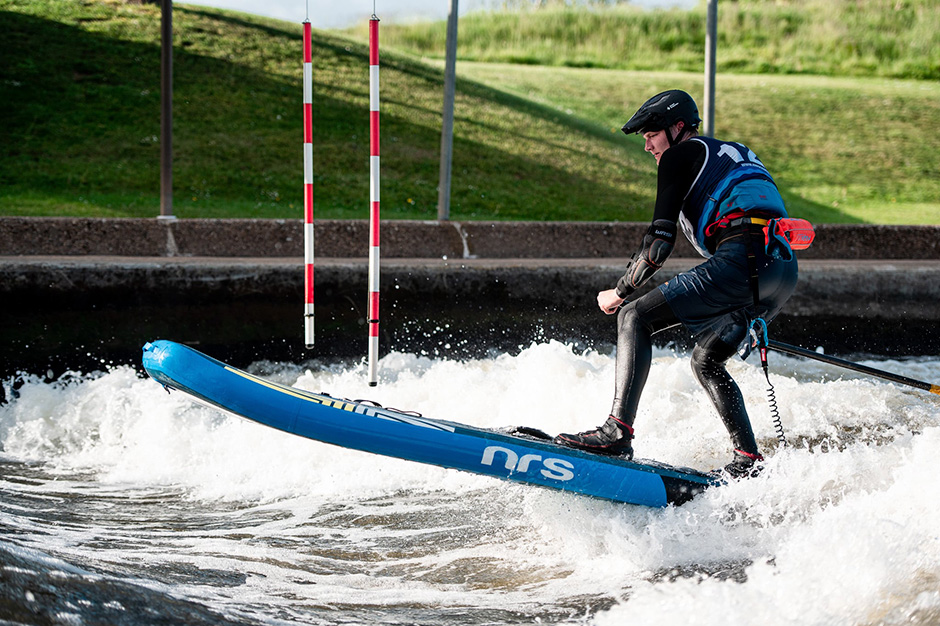
Tackling a hole at HPP. With enough speed and a good stance, you can paddle through the hole! Photo: Del
This also allows more weight to be put on the paddle itself, which, when used on moving water, pushes back through your arms, providing more of a ‘brace’ stroke whilst paddling. Sometimes overlooked, always remember to keep the front of your board facing the middle of the flow unless breaking into an eddy. This will help keep you balanced, as otherwise, you will end up fighting currents under your board that will start to push you sideways or spin your board around.
Keeping your board pointing where you want to go is so obvious but often forgotten. Doing so gives you more flexibility to swap your footing or paddle strokes to get you where you want to be.

Barry pointing forwards and keeping a blade in the water to stabilise himself at HPP. Photo: Del
Tackling white water features:
Once you have mastered the tripod stance, you can tackle holes, waves and other features. Finding the appropriate lines through these should be relatively easy if you come from a whitewater background, such as kayaking. This either comes with practice or coaching and varies from feature to feature.
One of the most important things to consider whilst tackling features is where you place your body weight on your board. Another important skill to be comfortable with doing on your SUP is moving about on it. Taking steps forwards and backwards is super important in all aspects of white water SUP, from river running to surfing to slalom. Some features may require a slightly more forward bias to your weight, involving taking a step forwards. This allows you to put your paddle in the water downstream of the feature and effectively pull yourself through it. Others may need a more middle or backwards weight distribution where you can benefit from a brace stroke rather than a driving stroke.

Joe paddling through a hole at HPP using the tripod stance! Photo by Tom Clare
Each feature will be different, and I use both techniques to get through features at HPP (where I paddle most) and find being able to use both extremely beneficial.
For beginners looking to improve their river running skills, finding some slow-moving white water, such as the UK classics of the Derwent at Matlock or the back channels of HPP, would be super useful. You can practice paddling downstream, eddying in and out, and other techniques.
2. How to use eddies to your advantage
When breaking into an ‘eddy’, it’s important to remember that eddy lines do exist (if you forget, be prepared to swim). Much like in a kayak, edges are essential, and more so even. If you forget your edges in a boat, the worst that happens is you might roll, but on a SUP, you could go for a nasty swim.

Having a break next to the eddy at our HPP SUP club
Del here! “An eddy is a calm, slower-moving patch of water on a river, and some obstacle generally forms it. Not all eddies are calm, though – on more powerful rivers, the eddies can be wild to match!
They can be an excellent place to pause for a rest or to plan your next moves when paddling down a river. The eddyline, where the eddy and the main flow meet, can be turbulent, so learning to cross this is an important skill in all whitewater paddling.” Back to Tom!
As you cross the eddy line into an eddy, ensure that your leading edge is raised so that the eddy line can slide nicely underneath the board rather than having the flow of water spilling over the top of the board, potentially losing your balance if it’s unexpected. When it comes to leaning and raising those edges, you won’t go too far, so while learning and getting to grips with basic paddling, it’s better to go for a stronger lean than a more slight one.

My friend Ewan trying my SUP and practising his lean! Photo by Tom Clare
Always aim above the eddy, as the current will still take you down the flow before you can get across to the eddy itself. Be pre-emptive, as if you are in line with the eddy and decide to go for it, or you will most likely miss it. When you get to the top (coming down the flow facing downstream), you want to get as close to that eddy line as possible; get right to the edge of the main flow so that as you reach the concrete groyne or rock, you can reach over it with your paddle blade. Dig in hard with your paddle in the eddy, and keep your fingers crossed; it will pull you and your board to the top of the eddy and do that nice stylish spin to face upstream that we all see the pro’s doing.
The single best thing you can do is practice making big eddies, small eddies, eddies on the river right and river left, ones far from features and those right behind features.
Swapping your feet over in your tripod stance might help, but I know some find it harder. If eddying out on the river left, I like paddling towards it on my right-hand side (dominant paddling side), then doing a cross-bow stroke into the eddy and then swapping my feet over when happily settled in that piece of water.

Ready to leave the eddy with my tripod stance! Photo: Eve Thurgood
3. How to surf your SUP
Surfing is one of my favourite parts of white water SUP and arguably one of the most impressive for spectators. Just as in freestyle kayaking, there are some tricks you can do and just as in traditional surfing in the sea, you can carve waves too. Here are some tips of mine for surfing.
The video of Tom surfing my board at HPP is below.
If you come across a nice surfing wave, you first want to find out which side is the easiest to enter the wave from. Usually, there is a nice eddy on one side, but if there is a nice one on both, pick the side opposite to the one you paddle on usually. For example, if you usually paddle on the right, your best bet is to enter from the left, so you don’t have to paddle on your non-dominant side.
The most crucial part of getting onto the wave is don’t stop paddling. If you do, you’ll likely be flushed off the back of the wave and probably lose your balance. Sploosh!

Tom falling off his board at HPP. Photo by Tom Clare
You aim to start at the back of the eddy (downstream or in line with the boil if possible) to give you time to gain speed, and when the nose of your board is about to bury itself in the wave as it drops downstream, use your paddle to pull yourself onto the wave with a nice strong drive stroke.
When you get on the wave, CONGRATULATIONS! Now you have to stay on! Usually, when you paddle downriver, all of your paddle strokes are done at the front of the board, but when you hop onto a wave, this moves to the back, and you use the blade to make tiny, ruder-like movements to keep your board straight. Try to carve or move about only a little on the wave; get used to keeping it straight first.
Tom surfing on Fairy wave at HPP. Photo by Tom Clare
You may need to move your feet some to stay balanced on the wave as you want your body weight on top or just barely in front of the boil, as this is the ‘sticky’ bit. For the most part, you should stay straight using your paddle or small leans with your body forwards and backwards.
Once you are comfortable, start experimenting with carving, which is done by using slightly stronger paddle movements and your body weight to move the board a little bit more. As with all aspects of paddling, the best thing you can do is practice! Find a nice static wave to practice on, and keep going. My personal favourite is Fairy wave at HPP.

Beth carving at HPP! Photo: Tom Clare
Set up a GoPro to catch that moment you get your first surf and have fun! Video analysis is a great way to identify areas for improvement. If you can, don’t panic when you make it on the wave (Ahem… Del… Ahem…), keep paddling, and then chill. You are more likely to swim if you’re stiff, rigid, and in panic mode. If you settle down on the wave and use those small movements with your paddle, you’ll be surfing, carving, bunny-hopping and more in no time!

Me in ‘panic mode’ whilst surfing at HPP. Photo by Tom Clare
Happy paddling, and see you on the water!
Thank you
Thanks very much for all the tips, Tom! And thank you for all the patience and coaching you have given me at SUP club!
The two tips that I found most helpful when starting white water SUP were standing in the tripod stance and bending my knees so that my centre of gravity was lowered. This helped me to stabilise myself on the turbulent white water and stay on my board. Eventually, I then tried some surfing – the video below!

Leave a comment